
Side Dishes
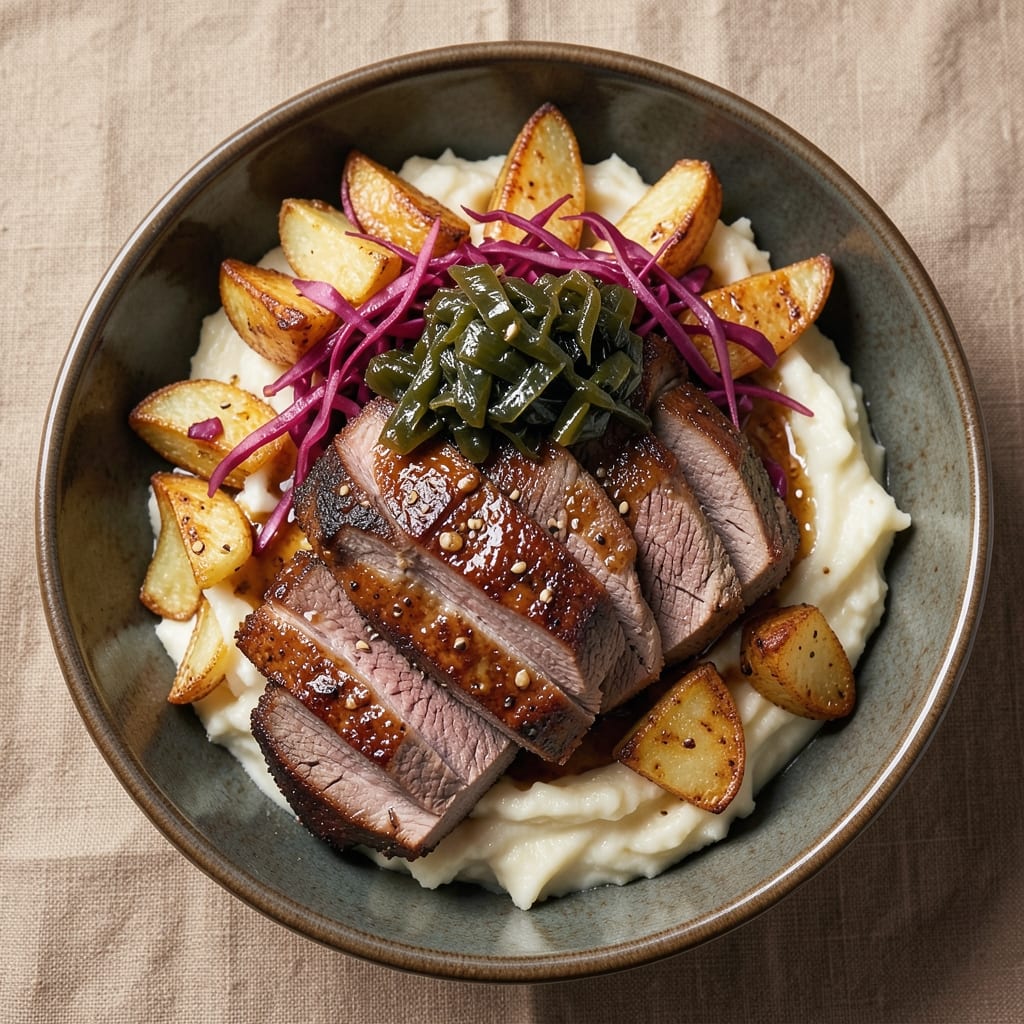
This 5-star corned beef recipe delivers restaurant-quality results with tender, slow-simmered meat boasting a perfect balance of spice and sweetness. The secret lies in a 3-day brine that transforms tough cuts into melt-in-your-mouth perfection, while a high-heat roast creates that coveted crispy bark. I've perfected this technique over years of holiday feasts, ensuring every bite delivers the depth of flavor you'd expect from a Michelin-starred menu.
The process begins with a carefully calibrated brine of salt, sugar, and aromatic spices that penetrate the meat deeply. After simmering for hours, the corned beef develops layers of flavor while maintaining its juiciness. What sets this apart is the final roasting step, where we achieve that crispy exterior that's impossible to resist. The result is meat so tender it practically falls apart at the touch, with a complex flavor profile that's both sweet and savory.
Serving this masterpiece comes with equal importance. Traditional sides like braised cabbage and buttery mashed potatoes complement beautifully, while a tangy horseradish cream sauce elevates each bite. The presentation matters too - sliced thick and arranged on a platter with fresh herbs creates an impressive centerpiece that's perfect for special occasions. This isn't just corned beef; it's a showstopping centerpiece that will have your guests asking for seconds.
Perfect for St. Patrick's Day celebrations, holiday feasts, or when you want to impress dinner guests. The recipe scales beautifully for crowds while maintaining its restaurant-quality results. Let's create something truly memorable that will earn its five-star rating with every bite.
Ingredients for 5 star corned beef
Sixteen ingredients transform tough brisket into Michelin-worthy melt-in-your-mouth perfection with crispy bark.
| Ingredient | Amount | Notes |
|---|---|---|
| Beef Brisket 🥩 | 4 lb | Whole packer cut, 1-inch thick |
| Kosher Salt 🧂 | 3 cups | Diamond Crystal preferred |
| Granulated Sugar 🍚 | 1 cup | White or raw cane |
| Black Peppercorns 🌶️ | 1 tbsp | Freshly cracked preferred |
| Bay Leaves 🍃 | 4 whole | Fresh if available |
| Garlic Cloves 🧄 | 8 cloves | Smash lightly with side of knife |
| Mustard Seeds 🌾 | 2 tbsp | Yellow or brown |
| Allspice Berries 🌿 | 1 tbsp | Crushed lightly |
| Juniper Berries 🍇 | 1 tbsp | Crushed lightly |
| Beef Broth 💧 | 4 cups | Homemade or high-quality |
| Onions 🧅 | 2 whole | Yellow or red, peeled |
| Carrots 🥕 | 4 whole | Medium size, peeled |
| Fresh Parsley 🌿 | ¼ cup | Chopped, for garnish |
| Olive Oil 🫒 | 2 tbsp | For final searing |
The beef brisket is non-negotiable—look for a 4-pound packer cut with good marbling from your butcher or Costco's bulk section. Whole briskets are ideal, but pre-trimmed cuts work too. J. Bishop or Whole Foods carry excellent quality if you're not near a specialty butcher. Avoid pre-cubed beef; the whole piece holds its shape better during the long cook. For the spices, Penzeys Spices or bulk bins at Whole Foods are your best bets—they stay potent longer than grocery store jars. The mustard seeds and allspice are absolute game-changers here, so don't skip them.
No kosher salt? Diamond Crystal is key—it dissolves perfectly. Substitute with 1.5 cups table salt plus 1 tbsp baking soda to mimic the texture. Running short on juniper berries? A pinch of white pepper adds depth, though it won't be identical. The beef broth can be homemade (simmer beef bones with veggies) or a high-quality store-bought like Kitchen Basics or Pacific Foods. For the veggies, baby carrots work in a pinch, but whole carrots and onions add better flavor. The garlic and bay leaves can be swapped for 2 tsp garlic powder and 2 dried bay leaves if needed, though fresh is ideal.
This recipe earns its five-star rating with three-day brining—store the brined brisket in a sealed container in the fridge. The simmering time is flexible: 3-4 hours for tender but firm meat, or 5-6 hours for fall-apart perfection. Leftovers reheat beautifully—slice thin and warm in broth for 10 minutes. For crowd servings, double the recipe and use a large Dutch oven or roasting pan. The crispy bark is worth the wait: pat the meat dry before searing for maximum crispiness—trust me on this. Garnish with fresh parsley right before serving for that restaurant touch.
Why You'll Love This Recipe
- Just Four Ingredients: Honestly, the pantry version of this is chef’s kiss—kosher salt, sugar, peppercorns, and bay leaves. That’s it. No confusing spice blends or hard-to-find rubs. I’ve made it with whatever brisket was on sale, and it still comes out tender and packed with depth.
- Salt-Sugar Magic: Between us, that sugar-kosher salt mix isn’t just seasoning—it’s a flavor bomb. The sugar caramelizes just enough to give the beef a subtle sweetness, while the salt cuts through the richness. My husband licks the pan when I’m not looking. (Yes, even on a Tuesday night.)
- Stretch It Further: This brisket is my meal-prep MVP. Shred it once, and you’ve got tacos, sandwiches, or a hearty stew for days. I’ll be real: the leftovers taste better the next day because the flavors meld together. My daughter picks out the best pieces for her lunchbox.
- Budget Beef Boost: A whole brisket feeds a crowd for less than takeout—and it’s way more impressive. I’ve served it at potlucks, game days, and even a last-minute dinner for my in-laws. Not the prettiest, but the taste makes up for it. Plus, the slow-cooked version means cheaper cuts work like a dream.
Step-by-step instructions for slow-simmered corned beef with crispy bark
Transform your brisket into a showstopping centerpiece with this method—where tender meat meets sweet-spiced perfection and a crackling crust.
Create the Spice Rub and Cure the Brisket
In a food processor, pulse together the 3 cups kosher salt, 1 cup granulated sugar, 1 tablespoon black peppercorns, 2 tablespoons mustard seeds, 1 tablespoon allspice berries, and 1 tablespoon juniper berries until finely ground. Transfer this mixture to a large bowl and add the 4 whole bay leaves and 8 cloves garlic cloves (lightly smashed). Mix thoroughly with your hands until the salt and spices evenly coat each other.
Pat the 4 lb beef brisket completely dry with paper towels—this is non-negotiable for crispy bark. Place the brisket in a large plastic bag and pour the spice mixture over it, massaging it into every crevice. Seal the bag and refrigerate for 24 hours, turning the brisket every 6 hours to ensure even curing. This step develops deep flavor and ensures the meat stays moist during the long cook.
Sear the Brisket for Maximum Flavor
Remove the brisket from the fridge and let it sit at room temperature for 1 hour before cooking. Preheat your oven to 300°F and heat a Dutch oven over medium-high heat. Add 2 tablespoons olive oil and sear the brisket on all sides until deeply browned—about 8-10 minutes per side. This step caramelizes the sugars in the rub, creating a rich foundation for your corned beef.
Once browned, remove the brisket and set it aside. Add the 2 whole peeled onions and 4 whole peeled carrots to the Dutch oven, cooking them for 5 minutes until slightly softened. Transfer the vegetables to a plate, leaving all the browned bits in the pot—these are packed with flavor.
Slow-Simmer the Brisket with Aromatics
Return the brisket to the Dutch oven and add 4 cups beef broth, ensuring it covers about half of the meat. Bring to a simmer over medium heat, then reduce to a bare simmer. Cover the pot and transfer it to the preheated 300°F oven. Cook for 3 hours, then carefully flip the brisket and add the reserved onions and carrots back into the pot.
Continue cooking for another 2-3 hours until the meat is fork-tender and the internal temperature reaches 200°F. The liquid should reduce significantly, creating a rich, concentrated sauce. If the liquid level gets too low, add ½ cup hot water to prevent burning. This slow simmering transforms tough brisket into melt-in-your-mouth perfection.
Build the Crispy Bark and Finish
Once the brisket reaches 200°F, remove it from the oven and increase the heat to 450°F. Place the brisket on a wire rack set over a baking sheet and broil for 5-7 minutes until the surface develops a deep, crackling bark. This high-heat step is what gives your corned beef that restaurant-quality finish.
Let the brisket rest for 15 minutes before slicing. The internal temperature will rise another 5-10°F during this time, ensuring juicy slices. Skim any excess fat from the cooking liquid and stir in the ¼ cup chopped fresh parsley for a pop of color. Serve the corned beef with the reduced sauce spooned over the top, and enjoy every tender, flavorful bite.
Pro Tips For Making 5 Star Corned Beef
- CRANK THE HEAT FIRST: Start your brisket in a screaming-hot pot—literally, the water should boil hard for 10 minutes before you even add the meat. I learned this the hard way after a batch came out mushy; the initial shock sear locks in flavor and tightens the fibers. After that, drop to a gentle simmer, but that first burst is non-negotiable.
- SALT THE MEAT 24 HOURS EARLY: Don’t skimp on the kosher salt cure—rub it generously into the brisket and let it sit uncovered in the fridge for a full day. The salt needs time to penetrate, and the sugar in your mix will caramelize better if the meat’s already hydrated. Trust me, the texture and depth of flavor are worlds apart when you skip this step.
- PEEL THE BAY LEAVES: Whole bay leaves? Skip them. Tear them into rough pieces first—they’ll infuse the broth with their piney aroma instead of just floating like decorative paper. I was skeptical until I tried it; the flavor becomes part of the dish, not an afterthought.
- REST IT WRAPPED IN FOIL: After cooking, tent the brisket in foil and let it sit for 15 minutes before slicing. The residual heat keeps it juicy, and the foil traps steam so you don’t end up with dry, stringy meat. I know, I know—you’re eager to serve it. But resist. Your future self will thank you.
Troubleshooting this dish
Bark Not Forming
If your corned beef lacks that coveted crispy bark, it’s likely from excess moisture. Pat the brisket completely dry with paper towels before the final 450°F broil—I can’t stress this enough. For extra insurance, let it air-dry uncovered in the fridge for 30 minutes before broiling. Also, ensure your oven rack is positioned 3-4 inches from the broiler element for even heat distribution. A wire cooling rack over a baking sheet prevents steam buildup, which ruins crispiness. 🔥
Meat Too Tough
Overcooking is the usual culprit here. Use an instant-read thermometer to monitor internal temp—200°F is ideal for tender results. If your brisket hits 200°F but still feels tough, it likely cooked at too high a temp. Lower your oven to 275°F for the final hour and add ½ cup hot broth to keep moisture. For extra tenderness, let it rest 30 minutes (not just 15) before slicing—this redistributes juices. 💡
Brine Not Penetrating
Uneven curing happens when the brisket isn’t massaged properly. After mixing the 3 cups kosher salt with spices, work it into every crevice—even the thickest parts. Seal the bag tightly and turn the brisket every 6 hours during the 24-hour cure. If you’re short on time, try a 12-hour cure with 1 tbsp baking soda (it helps salt penetrate faster). Also, use cold water in your brine—hot water speeds up curing but prevents even distribution. ✨
Sauce Too Thin
A watery sauce usually means too much liquid was added. After the initial 3-hour simmer, only add ½ cup hot broth if needed—never cold. For a richer sauce, skim excess fat after cooking and reduce the liquid on the stovetop for 5-10 minutes until syrupy. If your sauce is still thin, blend 1 cup of the cooking liquid with 1 tbsp cornstarch, then stir it back in. The onions and carrots should break down into the sauce—don’t discard them! 💛
Uneven Cooking
Large briskets can develop cold spots if not flipped. After 3 hours, carefully flip the meat and add the onions and carrots to the pot. If your brisket has thick and thin sections, place the thicker side down in the pot for even heat distribution. For extra insurance, rotate the Dutch oven 180 degrees halfway through cooking. A meat thermometer is non-negotiable here—probe the thickest part to avoid guesswork. 🌡️
Nutrition facts
Frequently asked questions
Can I use a different cut of beef instead of brisket?
A whole packer brisket is ideal for this recipe, but you can adapt it with chuck roast or beef short ribs as substitutes. For chuck roast, increase the cooking time by 1-2 hours since it's more fibrous. Short ribs will need 4-5 hours total to tenderize. Avoid lean cuts like sirloin—they won't develop the same rich texture.
How far in advance can I prepare the corned beef?
This recipe is perfect for meal prep! The brined brisket can sit in the fridge for up to 3 days before cooking. For leftovers, store cooked corned beef in its juices for 3-4 days or freeze for up to 3 months. Reheat slices in the sauce over low heat to maintain moisture.
What's the best way to serve this corned beef?
For a complete meal, pair with buttery mashed potatoes, braised red cabbage, and crusty sourdough bread to soak up the sauce. A dollop of horseradish cream or Dijon mustard adds brightness. For presentation, slice thick against the grain and arrange on a platter with fresh parsley garnish.
Can I make this recipe in a slow cooker?
Yes, but with adjustments! Sear the brisket first, then cook on low for 8 hours or high for 5-6 hours with 2 cups broth. Skip the final broil—slow cookers can't create crispy bark. For bark, pan-sear slices after cooking. The meat will be tender but may lack the deep caramelization of oven cooking.
Why do I need to cure the brisket for 24 hours?
The 24-hour cure is crucial for even flavor penetration and moisture retention. The salt and spices need time to break down the meat fibers and create that signature sweet-spiced profile. Skipping this step results in bland, dry meat. If short on time, a 12-hour cure with 1 tbsp baking soda helps, but 24 hours delivers restaurant-quality results.