
Soups & Stews
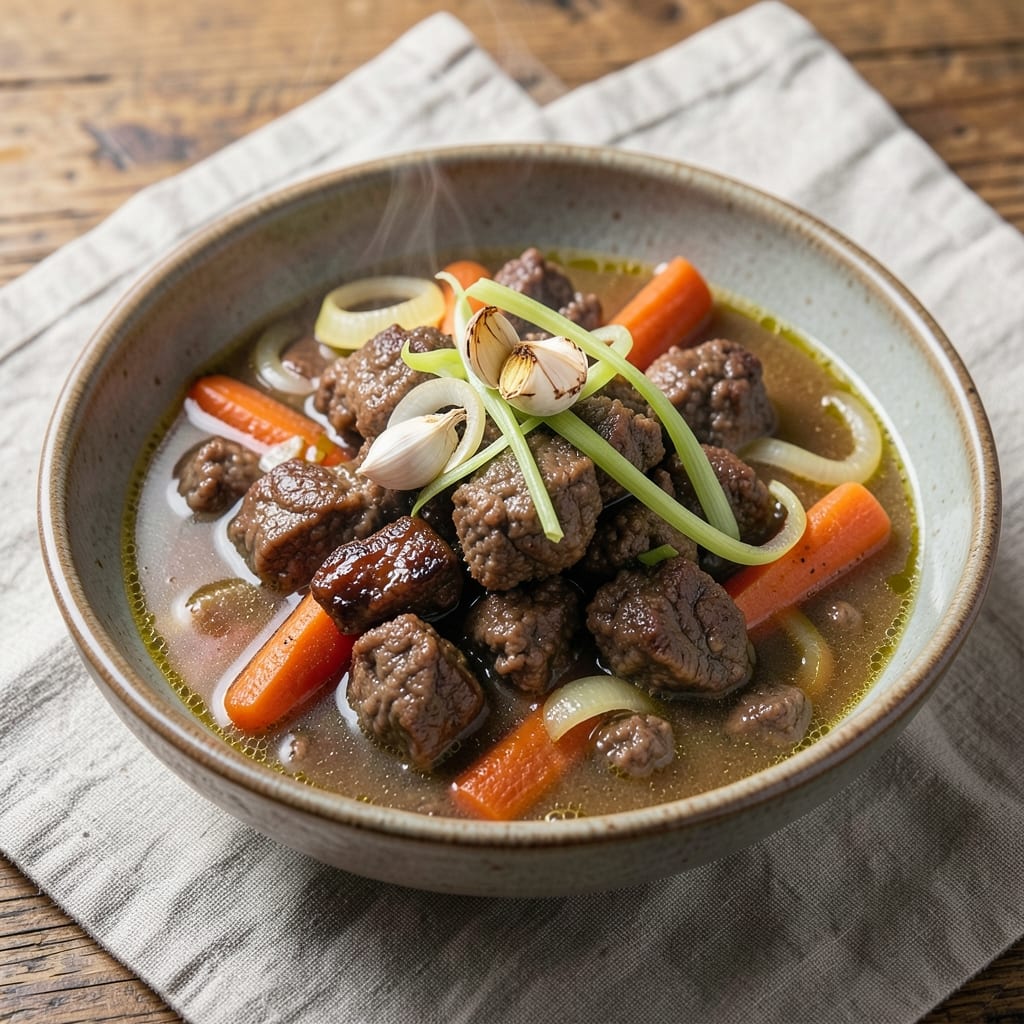
This ground beef chicken broth recipe transforms humble ingredients into a deeply satisfying one-pot meal that tastes like it simmered all day. The secret lies in browning the beef first—those caramelized bits form the flavor foundation, while the chicken broth adds rich umami depth without needing fancy techniques. I developed this during a particularly busy week when I needed a hearty dinner that required minimal effort but maximum flavor. It’s the kind of dish that disappears faster than you can say “second helping.”
The beauty of this recipe is its versatility—it’s hearty enough to stand alone but pairs beautifully with crusty bread, roasted potatoes, or a simple green salad. The beef absorbs the savory broth while staying tender, creating a dish that’s both comforting and restaurant-quality. What’s more, it comes together in under 45 minutes, making it perfect for weeknights when you crave something substantial without spending hours in the kitchen.
What you’ll end up with is a one-pot wonder that’s rich, aromatic, and packed with meaty flavor—no complicated steps required. The broth reduces slightly, intensifying the savory notes, while the beef develops a satisfying texture that’s tender yet substantial. It’s the kind of meal that feels indulgent but is simple enough to make on a regular basis. Trust me, this is one recipe that will become a staple in your rotation.
Serve it as-is for a comforting bowl of beef and broth, or use it as a base for other dishes like stuffed peppers, tacos, or even a quick pasta. The possibilities are endless, but the foundation is foolproof. Let’s get cooking!
Ingredients for ground beef chicken broth
Pantry staples plus a few fresh veggies—this one-pot meal delivers restaurant-style flavor without the fuss.
| Ingredient | Amount | Notes |
|---|---|---|
| Ground Beef (80/20) 🥩 | 1 ½ lb | Chuck or ground round preferred |
| Chicken Broth 💧 | 3 cups | Low-sodium preferred for control |
| Yellow Onion 🧅 | 1 whole | Medium size, diced |
| Garlic Cloves 🧄 | 4 cloves | Freshly minced |
| Carrots 🥕 | 2 medium | Peeled, sliced into rounds |
| Celery Stalks 🌿 | 2 whole | Trimmed, chopped |
| Tomato Paste 🍅 | 2 tbsp | Smooth consistency |
| Dried Thyme 🌿 | 1 tsp | Or 1 tbsp fresh |
| Ground Black Pepper 🌶️ | ½ tsp | Freshly cracked |
| Diamond Crystal Kosher Salt 🧂 | 1 ½ tsp | Adjust to taste |
| Olive Oil 🫒 | 1 tbsp | Extra-virgin preferred |
| All-Purpose Flour 🌾 | 1 tbsp | For thickening |
| Fresh Parsley 🌿 | ¼ cup | Chopped, for garnish |
The beef is where the magic starts. Ground chuck gives you that perfect balance of fat and lean—ground round works too if you prefer leaner. I always grab mine from Costco when I'm doing a big batch, but the regular supermarket stuff is fine for a weeknight. Look for packages labeled 80/20—that fat ratio makes all the difference. The broth? Low-sodium is key so you can control the seasoning. Swanson or Pacific Foods are my go-tos, but homemade works even better if you've got the time.
No fresh thyme? Dried works at one-third the amount, but fresh has that bright herbal note that's hard to beat. The tomato paste can be swapped for crushed tomatoes at double the amount—just strain out the seeds first. Carrots and celery are the veggie backbone here, but frozen chopped veggies work in a pinch. The flour is just for thickening at the end—skip it if you're using a thicker broth to begin with. For extra depth, add a bay leaf while simmering, then remove before serving.
This reheats beautifully—honestly tastes better the next day once everything melds together. Keeps for 4-5 days in the fridge, freezes for 3 months. I always double the batch because it disappears so fast. Portion into containers for easy lunches—just reheat with a splash of broth to keep it moist. The parsley garnish is optional, but it adds that fresh pop of color that makes the dish feel special.
Why You'll Love This Recipe
- Pantry-Friendly Magic: I swear by this one—no fancy ingredients, just what’s already lurking in your fridge. That 80/20 ground beef? It browns fast and packs a meaty punch without needing a butcher’s cut.
- Umami Bomb: The combo of caramelized onions, minced garlic, and simmered beef in chicken broth? It’s like a flavor hug. Honestly, I’ve made this three times this month because it just works—deep, savory, and never boring.
- Leftovers That Don’t Suck: Turns into the best next-day tacos, stuffed peppers, or even a quick soup. I’ll be real: my freezer is full of this stuff because it reheats like a dream and tastes even better cold.
- Budget Stretch: A single bag of ground beef and a carton of broth stretch into days of meals. Between us, this is how I feed my family for under $10—no fancy labels, just honest, filling food.
Step-by-step instructions for ground beef chicken broth
This one-pot method builds deep, rich flavor layer by layer—no fancy techniques required.
Sear the Ground Beef for Maximum Flavor
Heat the 1 tablespoon olive oil in a large Dutch oven or heavy pot over medium-high heat until shimmering. Add the 1.5 pounds ground beef (80/20) and break it apart with a wooden spoon, letting it brown in batches if needed. Cook for 8-10 minutes until the beef loses its raw color and develops a deep brown crust—this is where all the umami magic happens.
The high fat content in 80/20 ground beef is your friend here. Don't drain the rendered fat—it's the foundation of your broth's richness. You're looking for beef that's cooked through but still retains some moisture, with no pink remaining. If the pan gets too crowded, work in two batches to avoid steaming instead of searing.
Sauté the Vegetable Base
Push the browned beef to one side of the pot and add the 1 whole yellow onion, 2 medium carrots, and 2 whole celery stalks to the empty space. Cook for 5-6 minutes until the vegetables soften and the onion becomes translucent. Stir occasionally to prevent burning.
Here's where the flavor foundation gets built. The vegetables should release their natural juices and caramelize slightly at the edges. Add the 4 cloves garlic cloves and 2 tablespoons tomato paste, stirring for 1 minute until the garlic becomes fragrant. The tomato paste will deepen the color and add a subtle sweetness that balances the savory notes.
Deglaze and Build the Broth
Pour in the 3 cups chicken broth, scraping up any browned bits from the bottom of the pot with a wooden spoon—this is called deglazing, and it captures all those flavorful fond particles. Add the 1.5 teaspoons Diamond Crystal kosher salt, 0.5 teaspoon ground black pepper, and 1 teaspoon dried thyme, then bring the mixture to a gentle simmer over medium heat.
Let it cook uncovered for 20-25 minutes, stirring occasionally, until the vegetables are tender and the liquid has reduced by about one-third. The broth should smell like a warm hug of savory goodness—deep, aromatic, and slightly concentrated. If it starts to stick, add a splash of water to keep it moving.
Thicken and Finish
Remove the pot from heat and let it cool slightly for 2 minutes. In a small bowl, whisk together the 1 tablespoon all-purpose flour with 2 tablespoons cold water to make a slurry. Slowly pour this into the pot while stirring constantly to prevent lumping.
Return the pot to medium-low heat and simmer for 5-7 minutes until the broth thickens slightly—it should coat the back of a spoon but still be pourable. The flour acts as a natural thickener without altering the flavor profile. Taste and adjust seasoning if needed, remembering that the broth will continue to develop flavor as it cools.
Garnish and Serve
Strain the broth through a fine-mesh sieve into a clean pot or bowl if you prefer a smooth texture, or leave the vegetables in for a heartier presentation. Stir in the 0.25 cup chopped fresh parsley just before serving to add a bright, fresh contrast to the rich, savory broth.
This broth is incredibly versatile—use it immediately in soups, stews, or rice dishes, or let it cool completely and refrigerate for up to 5 days or freeze for 3 months. The flavors will only deepen with time, making it even more delicious for future meals. Serve warm with crusty bread for the ultimate comfort food experience.
Pro Tips For Making Ground Beef Chicken Broth
- Brown the Beef First: I learned this the hard way—skipping the browning step leaves your broth tasting like watered-down beef-flavored broth. Cook the ground beef in batches over medium-high heat until it’s deeply browned (not just pink), breaking it up with a spoon. That crusty bit? It’s where all the flavor hides.
- Slice the Onion Thinly: My grandmother swore by this, and she was right: thinly sliced onions caramelize faster and sweeten the broth without turning it into onion soup. Cut the onion into 1/8-inch slices instead of chopping—it makes a real difference in texture and flavor.
- Add Carrots Early, Remove Late: Toss the carrots in with the onions and beef for the first 10 minutes, then pull them out before the broth simmers. This way, they soften just enough to release sweetness without turning to mush. (Yes, even if you’re impatient like me.)
- Deglaze with Broth, Not Water: After browning the beef, splash in a little chicken broth (not water) to scrape up those flavorful bits stuck to the pan. It’s the thing that matters most—those bits are pure umami gold, and water just won’t cut it.
Make-ahead tips for this ground beef chicken broth
Prep Ahead Strategy
I always prep the vegetables first—they can sit in the fridge for 24 hours before cooking without losing quality. Dice the onion, slice the carrots, and chop the celery into a quart-sized airtight container with a splash of water. This keeps them fresh and ready to go. The garlic can be minced and stored separately in a small container. 🧅
Broth Prep Shortcut
Make the broth base ahead of time by browning the beef and sautéing the vegetables, then store them in a freezer bag with the tomato paste and spices. When you're ready to cook, just add the chicken broth and simmer. This cuts your cooking time to just 20 minutes on busy nights. The flavors stay vibrant even after freezing.
Freezing for Later
This recipe freezes beautifully for up to 3 months. Let it cool completely, then transfer to airtight containers or heavy-duty freezer bags, leaving 1-inch headspace for expansion. Thaw overnight in the fridge, then reheat gently on the stovetop with a splash of water or broth to restore moisture. I often make double batches because it disappears so fast. ❄️
Portion Control
Divide the cooked broth into 1-cup portions in microwave-safe containers for easy lunches. Reheat individual servings with 2 tablespoons water for 2-3 minutes on high power, stirring halfway. The broth thickens slightly when reheated, so adding liquid prevents it from becoming too concentrated. Perfect for meal prep on Sundays!
Flavor Development
The best part? This dish actually tastes better the next day as the flavors meld together. Let it sit in the fridge overnight, then reheat gently. The broth will reduce slightly, intensifying the savory notes. I always double the batch because it's impossible to resist seconds when it's this delicious. 💫
Equipment Essentials
Use a Dutch oven or heavy pot for even heat distribution—my All-Clad Stainless Steel is my go-to. If you don't have one, a large stainless steel pot works fine. For storage, I recommend Glasslock containers for reheating or Silicone Molds** for portion control. These keep everything fresh and ready for quick meals. 🍲
Nutrition facts
Frequently asked questions
Can I use ground turkey or chicken instead of beef?
Ground turkey or chicken works perfectly—just reduce cooking time by 2-3 minutes since they cook faster than beef. For extra richness, add 1 tablespoon olive oil to the pan. The texture will be slightly leaner, but the flavor remains just as satisfying.
How do I make this recipe gluten-free?
Simply omit the flour entirely and let the broth reduce naturally for 5-10 extra minutes to achieve a slightly thicker consistency. If you prefer a smoother texture, blend the cooked mixture (without vegetables) for 10 seconds—just be sure to strain out any lumps.
Can I add other vegetables to this recipe?
Yes! Try adding 1 cup diced potatoes (add in Step 3) or 1 bell pepper (chopped) with the carrots and celery. For heartier results, include 1 cup chopped mushrooms—they absorb the broth beautifully. Just adjust cooking time by 5-7 minutes if using starchy vegetables.
Why did my broth turn out too thin?
This usually happens if the broth didn't reduce enough or if you skipped the flour. For next time, simmer uncovered for 5 extra minutes to thicken naturally. If it's already too thin, stir in 1 tablespoon cornstarch mixed with 2 tablespoons water and simmer for 2 minutes. Avoid over-diluting—this broth should coat a spoon but remain pourable.
What's the best way to reheat leftovers?
Gently reheat on the stovetop over low heat with 2 tablespoons water or broth to prevent drying. For microwave reheating, use 50% power for 1-2 minutes, stirring halfway. Never reheat to boiling—just warm through to 165°F to preserve texture. The broth thickens slightly when reheated, so adding liquid prevents it from becoming gluey.