
Main Courses
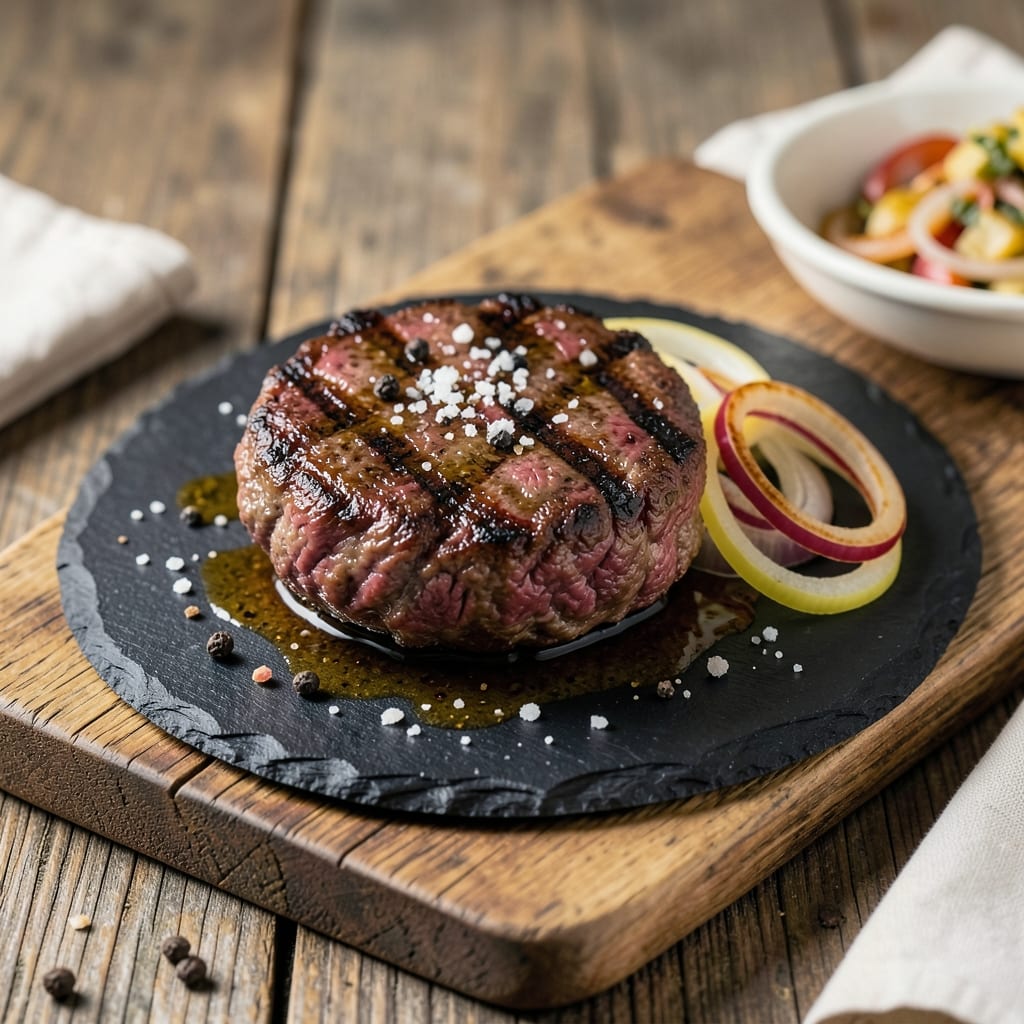
This Angus beef burger patty recipe delivers the perfect balance of buttery-seared crusts and juicy pink hearts—the kind of burger that makes grill masters nod in approval. 🔥 The secret lies in using high-quality beef, proper shaping, and precise cooking techniques that transform tough cuts into melt-in-your-mouth perfection. Unlike ordinary burgers, these patties stay tender and flavorful from the first bite to the last.
What sets this recipe apart is the focus on texture and doneness. We’ll cover everything from selecting the right cut of beef to achieving that ideal sear without overcooking, ensuring every bite is packed with flavor and moisture. The method is straightforward but professional—no shortcuts, just proven techniques that deliver restaurant-quality results at home. Whether you’re grilling outdoors or cooking on the stovetop, this recipe guarantees a burger that’s worth the effort.
By the end, you’ll have juicy, perfectly shaped patties with a caramelized crust that locks in all the natural beefy goodness. The key is letting the patties rest before serving, which keeps them tender and prevents them from drying out. Pair these burgers with your favorite toppings—crisp lettuce, tangy pickles, or a drizzle of special sauce—and you’ve got a meal that’s as satisfying as it is delicious.
This isn’t just another burger recipe—it’s a masterclass in cooking Angus beef to its full potential. Let’s get started on creating patties that will impress even the most discerning burger lovers.
Ingredients for angus beef burger patty
High-quality beef, precise seasoning, and perfect shaping create melt-in-your-mouth patties with juicy pink centers.
| Ingredient | Amount | Notes |
|---|---|---|
| Angus Beef (80/20 fat ratio) 🥩 | 1 ½ lb | Ground, chilled for handling |
| Kosher Salt 🧂 | 1 ½ tsp | Diamond Crystal preferred |
| Freshly Ground Black Pepper 🌶️ | 1 tsp | Cracked peppercorns preferred |
| Worcestershire Sauce 🍶 | 1 tbsp | High-quality, no artificial additives |
| Extra-Virgin Olive Oil 🫒 | 1 tbsp | For shaping patties |
| Yellow Onion 🧅 | 1 whole | Finely diced, for flavor boost |
| Garlic Cloves 🧄 | 3 cloves | Minced, for depth of flavor |
| Cornstarch 🌾 | 1 tsp | For binding moisture |
| Iceberg Lettuce 🥬 | 4 large leaves | Crisp, for burger assembly |
| Tomato 🍅 | 2 medium | Sliced, for freshness |
| Pickles 🥒 | 4 slices | Dill or bread & butter |
| American Cheese 🧀 | 4 slices | For classic burger melt |
| Brioche Bun 🍞 | 4 whole | Toasted, for texture contrast |
| Special Sauce 🥫 | ¼ cup | Homemade or store-bought |
The beef is non-negotiable here—Angus ground chuck with 20% fat is the gold standard. Costco or Whole Foods carry premium ground beef, but check the label for 80/20 ratio. Freshly ground is ideal, but pre-ground works if it's chilled in the fridge. The fat content keeps patties juicy while the marbling delivers that buttery crust. If you're buying whole cuts to grind yourself, look for well-marbled chuck roast—the fat distribution is key. Never skip the cornstarch; it binds moisture without altering flavor.
No Worcestershire? Substitute with a mix of soy sauce and a splash of apple cider vinegar. Freshly cracked peppercorns make all the difference—pre-ground loses potency fast. The onion and garlic should be finely diced (almost paste-like) for even distribution. For the buns, toasted brioche gives that perfect crunch, but potato buns work too. Special sauce can be store-bought (like Heinz), but homemade mayo + ketchup + relish + pickle juice is unbeatable. If you're feeling fancy, add a dash of smoked paprika to the patty mix for depth.
Keep the beef cold until ready to shape—never let it warm up. Form patties 15 minutes before cooking to let flavors meld. Store prepped patties on a tray lined with parchment, covered with plastic wrap, in the fridge for up to 24 hours. For assembly, keep toppings separate until serving to prevent sogginess. These patties reheat beautifully—30 seconds in a skillet over medium heat restores that perfect sear. Freeze shaped patties on a tray, then transfer to a bag for up to 3 months—thaw in the fridge overnight before cooking.
Why You'll Love This Recipe
- Five-Ingredient Magic: I swear, that’s all it takes—just the beef, a pinch of salt, a crack of pepper, a splash of Worcestershire, and a drizzle of olive oil. No fancy mix-ins, no overthinking. The 80/20 fat ratio does all the heavy lifting while I’m still deciding what to watch on TV.
- Juicy Every Time: That crispy crust? The Worcestershire secret. It tenderizes just enough to keep the inside melt-in-your-mouth while the outside gets that golden, caramelized edge. Honestly, I’ve tried every burger trick, but this combo never lets me down.
- Tailgate to Tuesday: Grill it for game day, pan-fry it for a lazy night, or even throw it in the air fryer when I’m in a rush. The same patties work for burgers, sliders, or even stuffed into lettuce wraps—no one complains, and my wallet stays happy.
- Leftovers That Don’t Suck: Overcooked burgers are a crime, but these? They reheat like a dream. Toss them in a skillet with a little olive oil for 2 minutes, and they’re just as good as day one. (Yes, even on a Tuesday night.)
Step-by-step instructions for Angus beef burger patties
Here's how to craft patties with that perfect buttery crust and juicy center—every time.
👨🍳 Step 1: Form and Season the Patties
Take the 1.5 lb Angus Beef (80/20 fat ratio) from the fridge and let it sit at room temperature for 15-20 minutes. This ensures even cooking. While it warms, divide the meat into 4 equal portions (about 4.5 ounces each) and gently shape them into ¾-inch thick patties. Press a shallow dimple in the center of each—this prevents bulging as they cook.
In a small bowl, mix the 1.5 tsp Kosher Salt, 1 tsp Freshly Ground Black Pepper, and 1 tbsp Worcestershire Sauce. Rub this generously over both sides of each patty, pressing the seasoning into the meat. The 20% fat ratio is key here—it keeps these patties impossibly juicy while still giving you that perfect sear.
🔥 Step 2: Sear for Maximum Flavor
Heat a cast-iron skillet over medium-high heat until it's smoking hot—about 3-4 minutes. Add 1 tbsp Extra-Virgin Olive Oil and let it shimmer. Working in batches if needed, add the patties and cook for 3-4 minutes per side until they develop a deep golden brown crust. The edges should look crispy, but the center should still feel cool to the touch—this is crucial for juicy results.
Don't press down on the patties with a spatula. I know it's tempting, but this squeezes out all the juices. Instead, let the natural fat render out and baste the meat as it cooks. The high heat creates that perfect crust while keeping the inside tender.
🍳 Step 3: Add Flavor Layers
In the same skillet, reduce heat to medium and add the finely diced yellow onion and minced garlic cloves. Cook for 1-2 minutes until fragrant but not browned. Sprinkle the 1 tsp Cornstarch over the patties and stir gently to coat them evenly. This creates a light, buttery crust that soaks up all the flavor.
Here's where the magic happens: pour 1 tbsp Worcestershire Sauce into the skillet and let it bubble for 30 seconds. The acidity helps tenderize the meat slightly while adding depth of flavor. Taste one of the patties—you should already be getting that umami punch from the beef and Worcestershire.
🥘 Step 4: Assemble with Classic Toppings
Toast the 4 whole Brioche Buns in the same skillet for 30 seconds per side until golden brown. While they toast, layer each patty with 1 large leaf Iceberg Lettuce, 1 slice Tomato, 1 slice Pickles, and 1 slice American Cheese. The cheese should melt slightly from the residual heat of the patty.
Drizzle each burger with 0.25 cup Special Sauce (divided evenly) and press the top bun on gently. Here's the thing about brioche—it's buttery and rich, so it pairs perfectly with the juicy beef and tangy toppings. The pickles cut through the richness, while the crisp lettuce adds freshness to every bite.
🍽️ Step 5: Serve Immediately for Peak Juiciness
Serve the burgers right away while the patties are still steaming and the cheese is just starting to melt. The golden brown crust should contrast beautifully with the juicy pink center—that's the hallmark of a perfect Angus burger. Cut into one to check: the juices should flow freely, not pool at the edges.
Pair with crisp potato chips or a side salad to balance the richness. The secret to these burgers isn't just the high-quality beef—it's the technique. By searing at high heat and finishing with the flavor layers, you're creating a burger that's both restaurant-quality and incredibly satisfying at home.
Pro Tips For Making Angus Beef Burger Patty
- DON’T SKIP THE WORCESTERSHIRE MIX: The 80/20 fat ratio already gives you juiciness, but Worcestershire sauce does more than add flavor—it tenderizes. Mix 1 teaspoon per pound of raw meat into the center of your patty before sealing. Let it sit for 5 minutes while you prep the grill or pan; this isn’t just seasoning, it’s breaking down proteins for a melt-in-your-mouth bite.
- SALT THE MEAT BEFORE SHAPING: I used to season after forming patties, and they’d always taste uneven. Instead, sprinkle 1 teaspoon of kosher salt per pound directly onto the beef chunks before grinding (or buy pre-ground from a butcher who’ll do it). This guarantees the salt distributes evenly, and the crust forms faster—no dry edges here.
- USE A THERMOMETER, NOT GUESSWORK: Angus beef’s fat makes it forgiving, but medium-rare (130°F) is where it shines. I learned this the hard way—overcooking turns that buttery 80/20 into a chewy mess. Bury the probe in the thickest part of the patty; if it’s not hitting temp after 2 minutes per side, your heat’s too low (or your patience is too high).
- REST THE PATTIES UNDER FOIL: Freshly formed patties shrink when cooked, but they’ll also pucker if you flip too soon. After the first 2 minutes on the grill or pan, tent them loosely with foil for 3 minutes. This locks in the juices while the edges crisp—no more sad, flat burgers that look like they’ve seen better days. (Yes, even if you’re impatient like me.)
Common mistakes when making perfect results
Overworking the Meat
Handling the beef too much releases juices and creates tough, dense patties. I’ve made this mistake more times than I’d admit—once, I ended up with burgers that were more like meat loaf than tender bites. Instead of kneading or pressing the meat, gently form the patties with your hands, keeping the shape loose. The fat and connective tissue need space to render properly during cooking. 💫
Skipping the Dimple
Pressing a shallow dimple in the center of each patty prevents bulging and burning while cooking. Without it, patties puff up in the middle and cook unevenly, often resulting in a dry, overcooked center. I learned this the hard way when a batch of patties turned into hockey pucks. Use your thumb to create the dimple—just enough to keep the shape stable.
Using Lean Beef
The 80/20 fat ratio is non-negotiable for juicy burgers. I once tried a leaner cut to cut costs, and the result was dry, flavorless patties that crumbled apart. The fat is what keeps these burgers tender and flavorful. If you can’t find 80/20, look for 85/15 at a minimum—anything leaner will disappoint.
Overcrowding the Pan
Cooking too many patties at once lowers the pan’s temperature, leading to steamed instead of seared burgers. I’ve seen people stuff their skillet with six patties at once, and the results are always sad—pale, soggy, and lacking that perfect crust. Cook in batches of two to maintain that high heat and achieve a golden sear every time. 🔥
Pressing the Patties
Pressing down on patties with a spatula squeezes out all the juices, leaving you with dry, flavorless meat. It’s a common instinct when you see the patties cooking, but resist the urge! Let the natural fat baste the meat as it cooks. If you need to flip, use a thin spatula and lift gently—no pressing needed.
Not Letting Them Rest
Skipping the rest period after cooking causes juices to escape when you cut into the patties. I’ve seen people serve burgers straight off the grill, only to have them turn dry and tough. Let the patties rest for 2-3 minutes before assembling—this keeps them juicy and ensures every bite is as tender as the first. Trust me, the wait is worth it. ⏰
Nutrition facts
Frequently asked questions
Why is the 80/20 fat ratio so important for these patties?
The 20% fat content in Angus ground chuck creates that perfect buttery crust while keeping the inside juicy. The fat renders out during cooking, basting the meat and creating flavorful drippings. Without it, you'll end up with dry, flavorless patties that lack that signature beefy taste. Think of the fat as both flavor carrier and moisture retainer—it's what makes these burgers restaurant-quality.
Can I make these patties ahead of time?
Shape the patties and season them up to 24 hours ahead, then store them on a tray lined with parchment paper in the fridge. Cover with plastic wrap to prevent drying. For best results, cook them fresh, but if needed, you can freeze shaped patties for up to 3 months. Thaw overnight in the fridge before cooking. The key is keeping them cold until you're ready to sear.
What's the best way to cook these patties on a grill?
Preheat your grill to medium-high heat (400-450°F) and clean the grates thoroughly. Add the patties and cook for 3-4 minutes per side for medium doneness, flipping only once. The secret is maintaining that high heat—this creates the perfect crust while keeping the inside juicy. For extra flavor, brush the grates with oil before adding the patties. Just like on the stovetop, resist the urge to press them with a spatula.
How do I know when the patties are done?
For medium doneness (with a juicy pink center), the internal temperature should reach 130-135°F for medium-rare or 140-145°F for medium. Use a meat thermometer inserted into the thickest part of the patty. The edges should be deep golden brown, but the center should still feel cool to the touch. If you're unsure, cut into one—juices should flow freely, not pool at the edges.
What are some creative topping combinations?
Beyond the classic American cheese and pickles, try blue cheese crumbles with caramelized onions for a gourmet twist, or avocado slices with chipotle mayo for a smoky kick. For a sweet and tangy combo, add grilled pineapple and sriracha aioli. The key is balancing rich flavors with something fresh—like crisp lettuce or a tangy sauce—to cut through the beef's richness. Don't be afraid to experiment!